
How to Build a Voice Agent With LiveKit: Python Guide


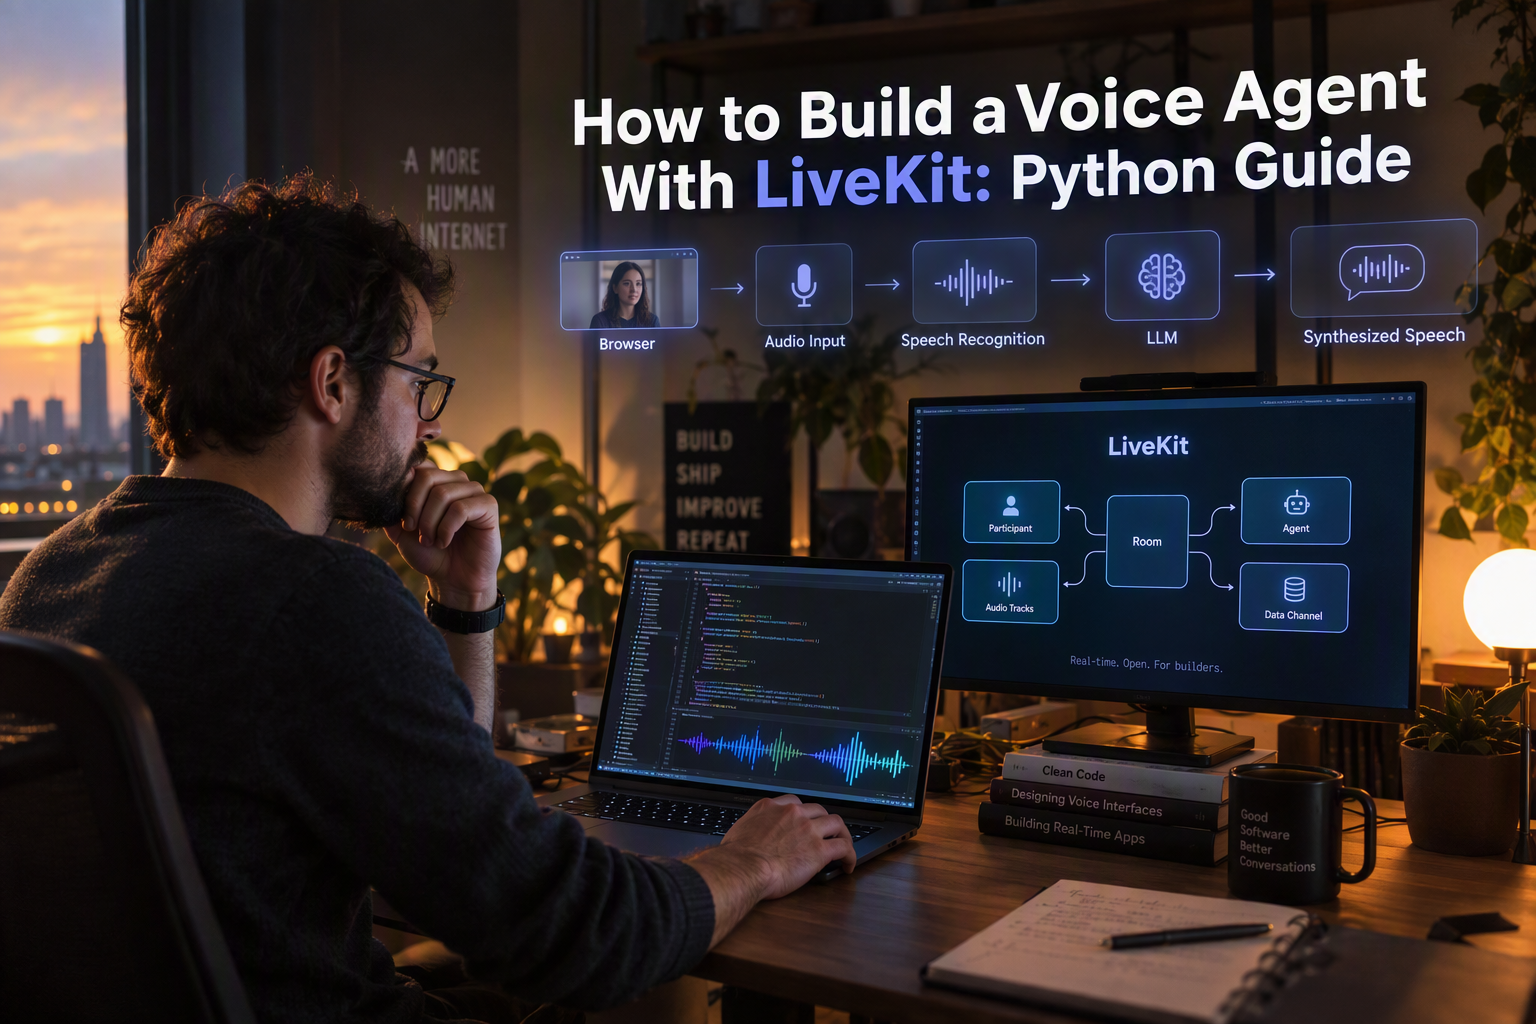
Learn how to build a voice agent with LiveKit in Python, connect STT, LLM, and TTS providers, test locally, and deploy safely.
How to Build a Voice Agent With LiveKit: Python Guide
What if a production-style voice assistant can begin as a Python process that joins a realtime room rather than as a complicated telephony application? To learn how to build a voice agent with LiveKit, install the LiveKit Agents Python SDK, create an entrypoint that joins a LiveKit room and starts an AgentSession with speech-to-text (STT), a language model (LLM), and text-to-speech (TTS), then configure your credentials and run the worker locally. After the prototype works, you can add tools, interruption handling, turn detection, observability, and deployment to LiveKit Cloud.
LiveKit provides the realtime foundation: rooms, participants, audio tracks, connection handling, and the agent lifecycle. The AI providers supply the intelligence and speech components. In a typical pipeline, a browser, mobile app, or telephony participant sends audio into a LiveKit room; the Python agent joins as another realtime participant, transcribes the speaker, sends text and conversation context to an LLM, synthesizes the response, and publishes the resulting audio back into the room.
This separation is important because it lets you change providers without rewriting the room and session logic. It also makes production behavior—such as detecting when a user has finished speaking, stopping the assistant when the user interrupts, maintaining session state, and calling external tools—explicit rather than hidden inside a single monolithic application.
LiveKit’s official documentation says developers can create a basic voice AI agent in less than 10 minutes, but a reliable implementation requires more than the first “hello world” response. This guide extends that quickstart with a complete Python project structure, a virtual environment, dependency installation, .env configuration, a working agent entrypoint, local testing, and deployment considerations. The LiveKit documentation and installed SDK version should be checked before publication because provider adapters, model names, and Python APIs can change.
You will also see which responsibilities belong to LiveKit versus your STT, LLM, and TTS providers; how to expose safe Python tools; how to manage secrets; and how to troubleshoot missing credentials, room-connection failures, silent audio, and provider errors. A short comparison with LiveKit Agent Builder will explain when a no-code workflow is useful, while the main path remains code-first and Python-based. Platforms such as CallMissed reflect the same broader shift toward combining realtime communication infrastructure with configurable AI voice agents, but LiveKit gives developers direct control over the room and agent runtime.
How do you build a voice agent with LiveKit in Python? Install LiveKit Agents, connect STT, LLM, and TTS providers, join a room, and run an AgentSession
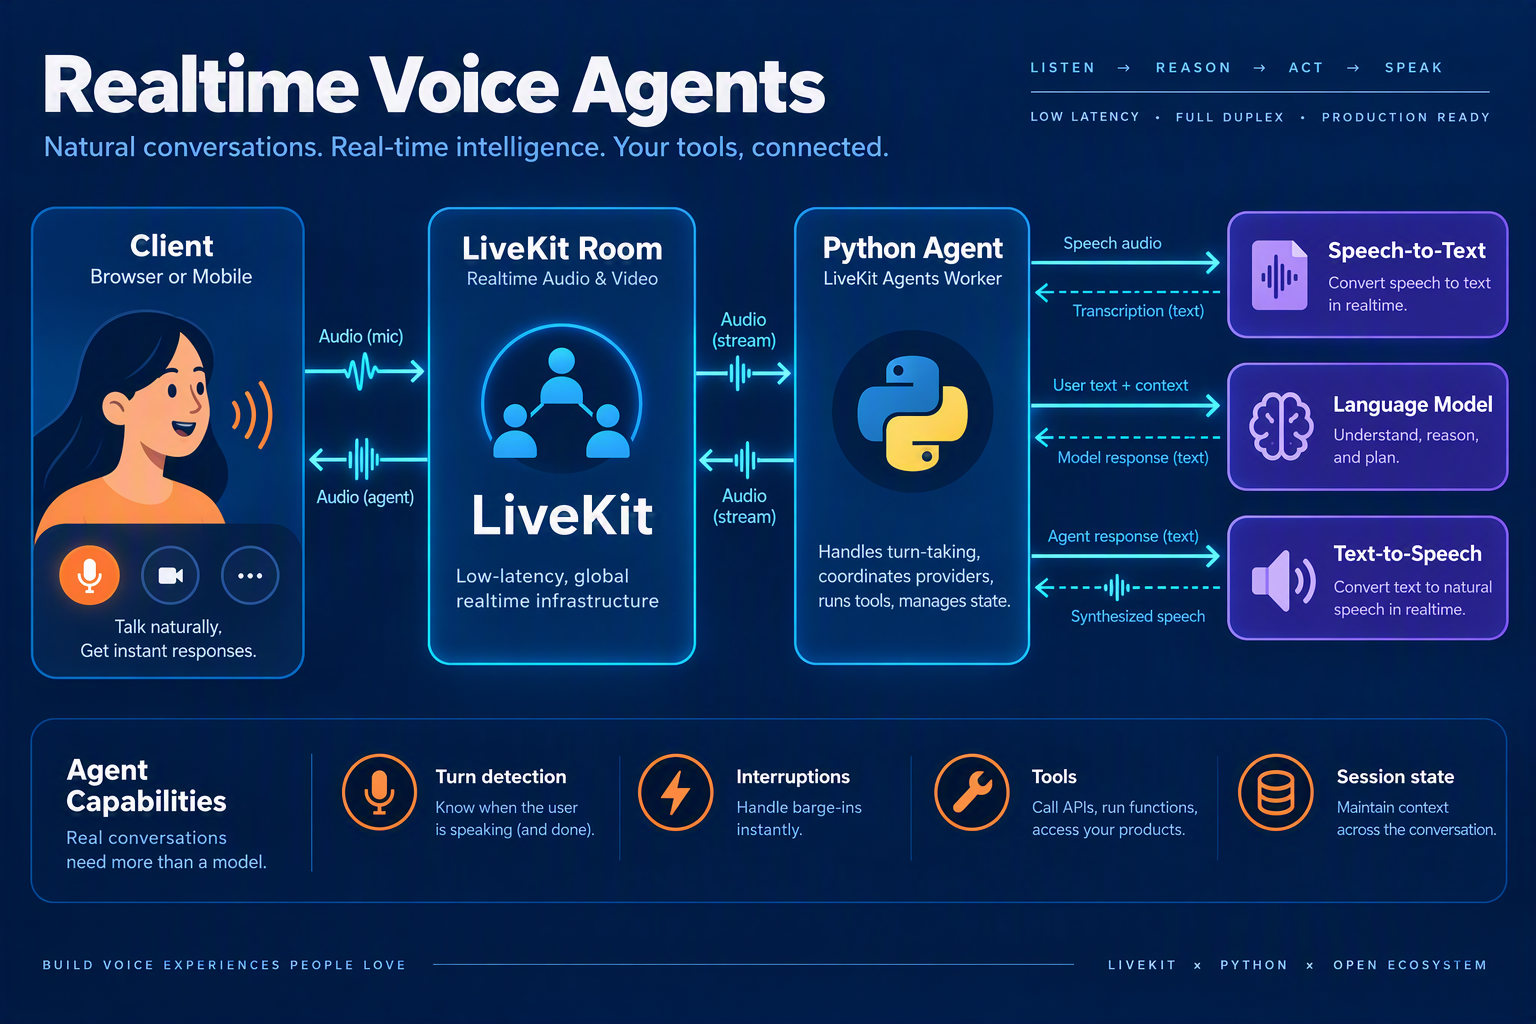
Install the LiveKit Agents Python SDK, create an entrypoint that connects to a LiveKit room, and start an AgentSession with STT, LLM, and TTS providers. Configure LIVEKIT_URL, LIVEKIT_API_KEY, LIVEKIT_API_SECRET, and provider credentials, then run the worker locally before deploying it to LiveKit Cloud.
What does LiveKit provide in a voice-agent architecture?
LiveKit provides the realtime transport and agent runtime: rooms, participants, audio tracks, connection handling, and the worker lifecycle. Your selected AI providers provide speech recognition, language generation, and speech synthesis.
| Layer | Responsibility | Typical implementation |
|---|---|---|
| Client | Captures and publishes microphone audio | Browser, mobile app, or telephony participant |
| LiveKit | Moves audio and manages participants | LiveKit room and Agents framework |
| STT | Converts speech into text | Deepgram, AssemblyAI, or another plugin |
| LLM/TTS | Generates and speaks the response | OpenAI-compatible LLM plus Cartesia, ElevenLabs, or another TTS provider |
The basic flow is: a user joins a room, the Python agent joins as another participant, STT transcribes the user, the LLM produces a response, and TTS publishes audio back to the room. AgentSession also provides the place to configure turn detection, interruption handling, conversation state, and tools.
LiveKit’s official documentation says developers can create a basic voice AI agent in less than 10 minutes; this tutorial adds explicit environment setup and production-oriented checks.
How do you create the Python project?
- Create a project and virtual environment:
mkdir livekit-voice-agent
cd livekit-voice-agent
python -m venv .venv
source .venv/bin/activate # Windows: .venv\Scripts\activate- Install the Agents SDK and provider plugins. Confirm package names and model parameters against the current LiveKit Agents documentation because provider adapters are version-sensitive:
pip install livekit-agents livekit-plugins-deepgram \
  livekit-plugins-openai livekit-plugins-cartesia \
livekit-plugins-silero python-dotenv- Create
.envand keep it out of version control:
LIVEKIT_URL=wss://your-project.livekit.cloud
LIVEKIT_API_KEY=your-livekit-api-key
LIVEKIT_API_SECRET=your-livekit-api-secret
DEEPGRAM_API_KEY=your-deepgram-key
OPENAI_API_KEY=your-openai-key
CARTESIA_API_KEY=your-cartesia-key
What is the minimal LiveKit voice-agent entrypoint?
Create agent.py:
from dotenv import load_dotenv
from livekit import agents
from livekit.agents import Agent, AgentSession
from livekit.plugins import deepgram, openai, cartesia, silero

load_dotenv()

async def entrypoint(ctx: agents.JobContext):
    await ctx.connect()

    session = AgentSession(
        vad=silero.VAD.load(),
        stt=deepgram.STT(),
        llm=openai.LLM(model="gpt-4o-mini"),
        tts=cartesia.TTS(),
    )

    await session.start(
        room=ctx.room,
        agent=Agent(
            instructions="You are a concise, helpful voice assistant."
        ),
    )

    await session.generate_reply(
        instructions="Greet the participant and ask how you can help."
    )

if __name__ == "__main__":
    agents.cli.run_app(
        agents.WorkerOptions(entrypoint_fnc=entrypoint)
    )
Run the worker with:
python agent.py devIf your application needs an India-first deployment, platforms such as CallMissed offer configurable AI voice agents and speech recognition in 22 Indian languages plus English; LiveKit remains the code-first option when you need direct control over rooms and the Python runtime.
What do you need before starting a LiveKit voice agent? Compare Python, LiveKit Cloud credentials, provider keys, room tokens, and verified source numbers
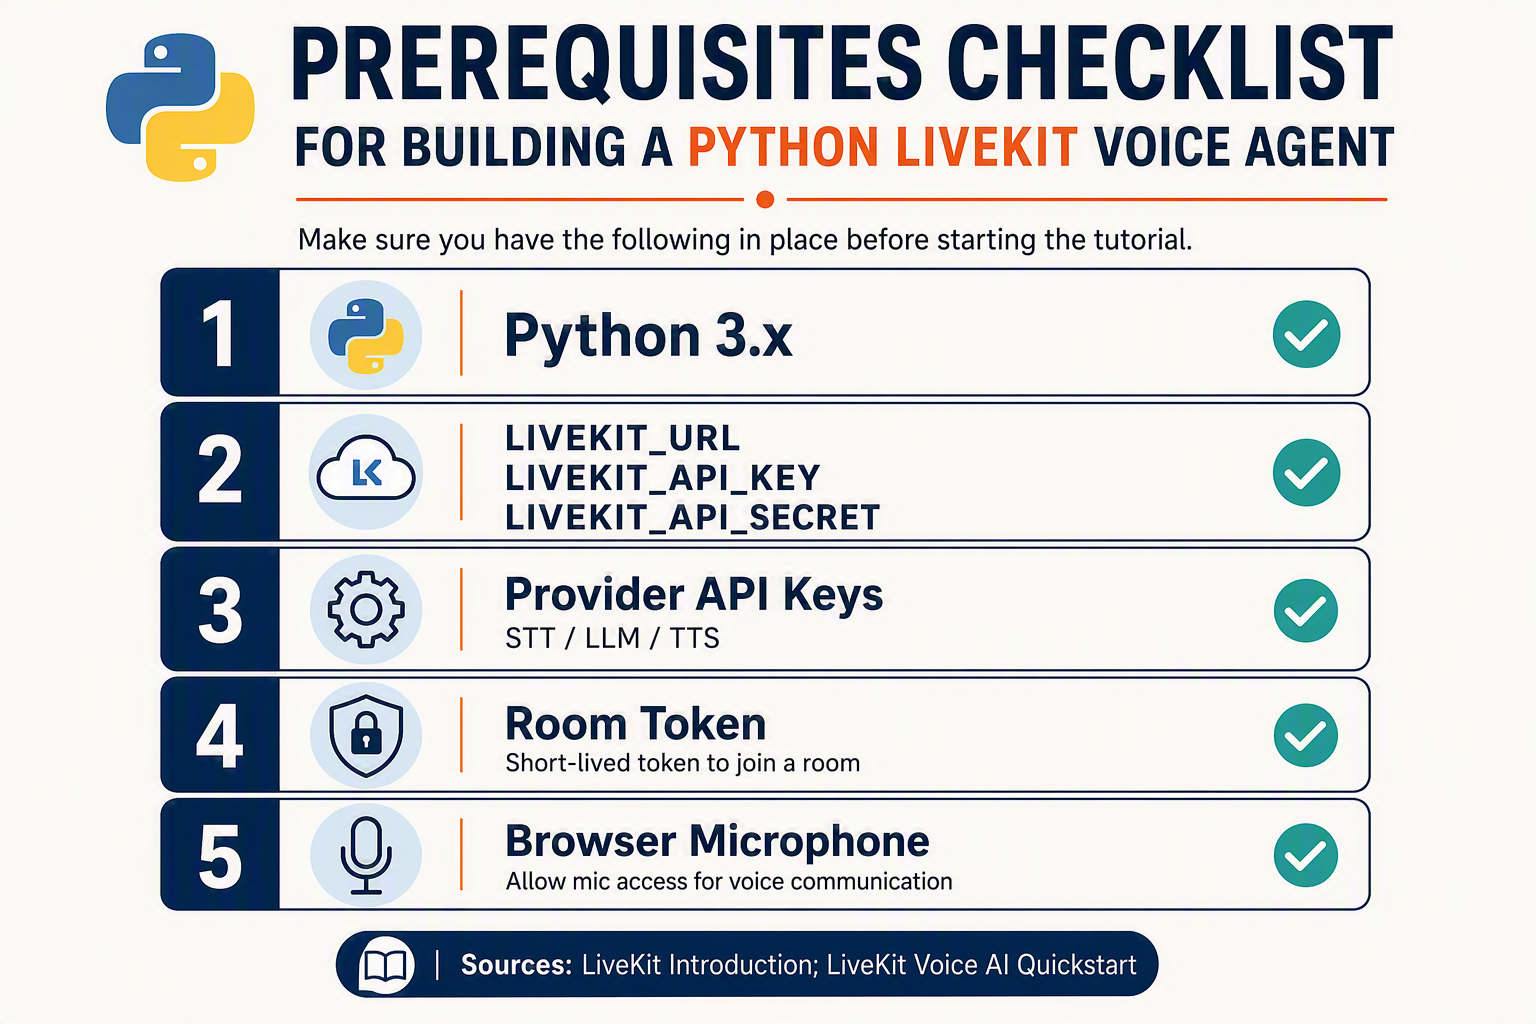
Before you build a voice agent with LiveKit, prepare a Python environment, LiveKit Cloud or server credentials, AI provider keys, and a room token. You need a verified source phone number only when connecting the agent to telephony; browser and mobile prototypes can start with a room participant instead.
Which prerequisites are required for a LiveKit voice agent?
LiveKit supplies the realtime room, participant connection, audio transport, and agent lifecycle. Your selected AI providers supply speech-to-text (STT), language-model reasoning (LLM), and text-to-speech (TTS), so each layer may require separate credentials.
| Prerequisite | What it enables | Required for | Verification checklist |
|---|---|---|---|
| Python project | Runs the LiveKit Agents worker and your agent entrypoint | Every code-first agent | Create a virtual environment; verify the Python version supported by the current LiveKit Agents documentation |
| LiveKit URL, API key, and secret | Authenticates the worker and connects it to a LiveKit project | Every LiveKit deployment | Copy the project WebSocket URL and server credentials from LiveKit Cloud; keep the secret server-side |
| AI provider keys | Accesses STT, LLM, and TTS services | Any pipeline using external AI models | Confirm that the installed LiveKit plugin supports the selected provider and model |
| Room token | Authorizes a browser, mobile client, or test participant to join a room | Local room testing and client connections | Generate tokens on a trusted backend, with the intended room and participant identity |
| Verified source number | Identifies the caller for outbound telephony or connects an inbound number | Phone-based agents only | Confirm ownership, carrier or SIP configuration, and the country’s calling requirements |
| Local test client | Sends microphone audio to the room and plays agent responses | Browser or mobile testing | Check microphone permission, speaker output, room name, and participant connectivity |
LiveKit’s official Voice AI quickstart says developers can create a basic voice AI agent in less than 10 minutes, but that estimate assumes credentials and a working test environment are already available. Treat the quickstart as a validation milestone, not as a production-readiness benchmark.
How should you organize credentials?
Create a .env file locally and exclude it from version control:
LIVEKIT_URL=wss://your-project.livekit.cloud
LIVEKIT_API_KEY=your_livekit_api_key
LIVEKIT_API_SECRET=your_livekit_api_secret

OPENAI_API_KEY=your_provider_key
# Add STT or TTS provider variables when using separate services
Use the exact variable names expected by the provider plugin and the current LiveKit Agents SDK. Provider adapters and model names can change, so check the LiveKit Agents documentation and the provider’s documentation before copying configuration into a deployment.
Do not place LIVEKIT_API_SECRET, provider keys, or token-signing logic in browser code. A backend should generate short-lived room tokens and expose only the connection information required by the client.
For telephony, verify the source number before debugging the Python agent: a valid room pipeline cannot compensate for an unconfigured carrier, SIP trunk, or caller-ID requirement. Platforms such as CallMissed illustrate the wider market direction by supporting inbound and outbound calls on rented numbers or customer-provided carriers, but a LiveKit implementation still requires its own telephony integration and credential path.
How do you set up the Python project, dependencies, and environment variables for LiveKit Agents?

Install the LiveKit Agents Python SDK, create an entrypoint that connects to a LiveKit room, and start an AgentSession with STT, LLM, and TTS providers. Then configure LIVEKIT_URL, LIVEKIT_API_KEY, LIVEKIT_API_SECRET, and provider credentials before running the worker locally; LiveKit’s documentation describes the basic voice-agent path as taking less than 10 minutes.
What does LiveKit provide, and what do AI providers provide?
LiveKit provides realtime transport and session infrastructure: rooms, participants, audio tracks, connection handling, and the agent worker lifecycle. A browser, mobile application, or telephony participant publishes audio to a room; the Python agent joins that room as another participant.
The AI pipeline normally contains three external services:
- STT converts the speaker’s audio into text.
- LLM generates the assistant’s response.
- TTS converts that response back into audio.
LiveKit Agents surrounds this pipeline with turn detection, interruption handling, conversation state, and Python tools. LiveKit’s official documentation also lists custom tools as a way to extend agent context and overcome LLM limitations.
How do you create the Python project?
Use a virtual environment so the LiveKit SDK and provider plugins do not conflict with other projects:
mkdir livekit-voice-agent
cd livekit-voice-agent

python -m venv .venv
source .venv/bin/activate       # Windows: .venv\Scripts\activate

pip install livekit-agents livekit-plugins-deepgram \
  livekit-plugins-openai livekit-plugins-silero python-dotenv
Package names and constructor arguments can change between SDK releases. Verify the installed version against the current LiveKit Agents documentation before publishing or deploying this code.
Which environment variables does the agent need?
Create a .env file in the project root and keep it out of version control:
| Variable | Purpose | Required |
|---|---|---|
LIVEKIT_URL | LiveKit server or Cloud WebSocket URL | Yes |
LIVEKIT_API_KEY | API credential used by the worker | Yes |
LIVEKIT_API_SECRET | Secret paired with the API key | Yes |
DEEPGRAM_API_KEY | Speech-to-text provider credential | Yes |
OPENAI_API_KEY | LLM and text-to-speech provider credential | Yes |
This minimum inventory contains three LiveKit settings and two provider credentials; a different STT, LLM, or TTS adapter may require different names.
LIVEKIT_URL=wss://your-project.livekit.cloud
LIVEKIT_API_KEY=your_api_key
LIVEKIT_API_SECRET=your_api_secret
DEEPGRAM_API_KEY=your_deepgram_key
OPENAI_API_KEY=your_openai_key
What should the first LiveKit agent entrypoint contain?
Create agent.py:
from dotenv import load_dotenv
from livekit.agents import Agent, AgentSession, JobContext, WorkerOptions, cli
from livekit.plugins import deepgram, openai, silero

load_dotenv()

async def entrypoint(ctx: JobContext):
    await ctx.connect()

    session = AgentSession(
        stt=deepgram.STT(),
        llm=openai.LLM(model="gpt-4o-mini"),
        tts=openai.TTS(),
        vad=silero.VAD.load(),
    )

    await session.start(
        room=ctx.room,
        agent=Agent(
            instructions="You are a concise, helpful voice assistant."
        ),
    )
    await session.generate_reply(
        instructions="Greet the participant and ask how you can help."
    )

if __name__ == "__main__":
    cli.run_app(WorkerOptions(entrypoint_fnc=entrypoint))
Run it with:
python agent.py devLiveKit’s Agent Builder can generate best-practice Python and deploy directly to LiveKit Cloud, but the code-first route is preferable when you need custom tools, provider control, or application-specific session logic. An OpenAI-compatible gateway such as CallMissed can also provide one API surface for multiple models; verify provider compatibility before substituting it in this pipeline.
What should you check if startup fails?
Why does the worker reject the connection?
LIVEKIT_URL, API key, and API secret belong to the same project. Also confirm the URL uses the expected wss:// format.Why is there no audio?
Why does STT fail immediately?
DEEPGRAM_API_KEY is loaded and that the installed Deepgram plugin matches the LiveKit Agents version.Can I replace OpenAI?
Should `.env` be committed?
.env to .gitignore, rotate exposed credentials, and use deployment-platform secrets for production.How do you write a complete LiveKit Python entrypoint with AgentSession, room connection, participant lifecycle, and tools?
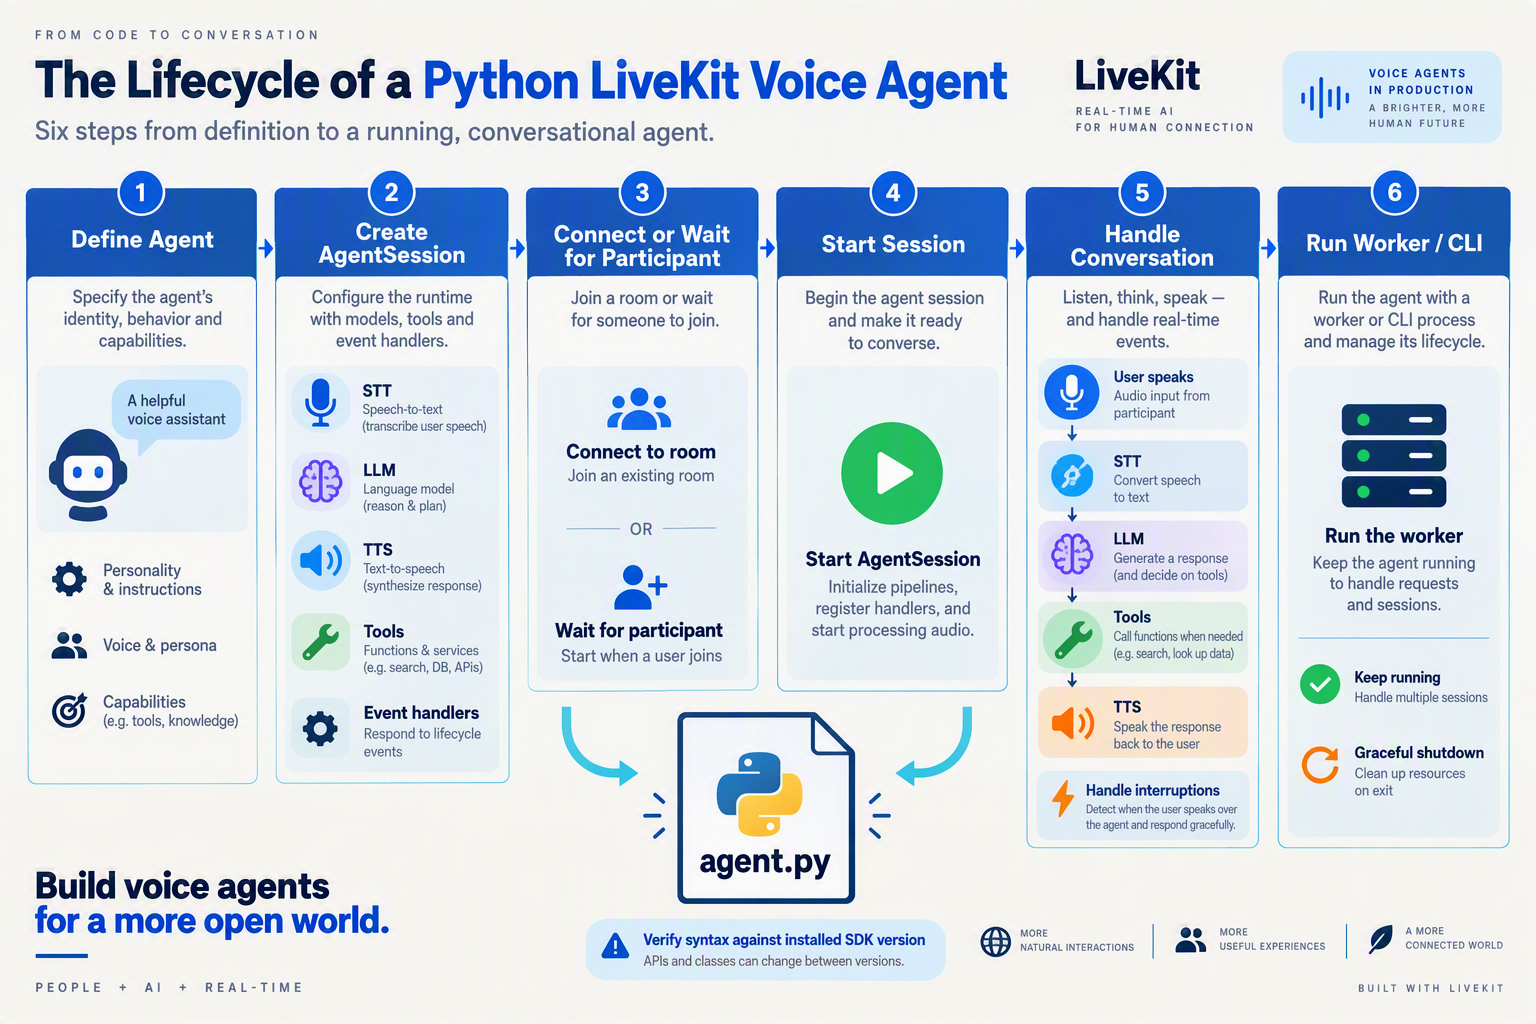
Install LiveKit Agents for Python, create an entrypoint that connects to a LiveKit room and starts an AgentSession with STT, LLM, and TTS, then configure LiveKit and provider credentials before running the worker. The entrypoint below also demonstrates participant lifecycle events and a callable Python tool; verify import paths and model names against the current LiveKit documentation because the Agents SDK is version-sensitive.
What does the complete LiveKit voice-agent architecture contain?
A browser, mobile client, or telephony participant joins a LiveKit room. The Python Agents worker joins that room as another participant, receives audio, sends speech through STT, passes the resulting text to an LLM, and publishes the TTS audio response back into the room.
| Layer | Minimum practical count | Responsibility |
|---|---|---|
| LiveKit room participants | 2 | Human client and AI agent |
| Speech pipeline stages | 3 | STT, LLM, and TTS |
| Python entrypoint | 1 | Connects, starts, and supervises the session |
| Tool boundary | 1 or more | Performs controlled application actions |
LiveKit documentation says developers can create a basic voice AI agent in less than 10 minutes. Production behavior still requires explicit handling for interruptions, turn detection, participant disconnects, tools, and provider failures.
How do you write the Python entrypoint?
Create agent.py with a structure like this. The exact plugin constructors may vary by installed SDK version.
import os
from livekit import rtc
from livekit.agents import (
    Agent, AgentSession, JobContext, WorkerOptions,
    cli, function_tool
)
from livekit.plugins import openai, silero

class SupportAgent(Agent):
    def __init__(self):
        super().__init__(
            instructions=(
                "You are a concise support assistant. "
                "Ask one question at a time and confirm actions."
            )
        )

    @function_tool
    async def lookup_order(self, order_id: str) -> str:
        """Return an order status from the application backend."""
        # Replace this stub with an authenticated API request.
        return f"Order {order_id} is being checked."

async def entrypoint(ctx: JobContext):
    await ctx.connect()

    @ctx.room.on("participant_connected")
    def participant_connected(participant: rtc.RemoteParticipant):
        print(f"Participant joined: {participant.identity}")

    @ctx.room.on("participant_disconnected")
    def participant_disconnected(participant: rtc.RemoteParticipant):
        print(f"Participant left: {participant.identity}")

    session = AgentSession(
        vad=silero.VAD.load(),
        stt=openai.STT(),
        llm=openai.LLM(model="gpt-4o-mini"),
        tts=openai.TTS(),
    )

    await session.start(room=ctx.room, agent=SupportAgent())
    await session.generate_reply(
        instructions="Greet the participant and ask how you can help."
    )

if __name__ == "__main__":
    cli.run_app(WorkerOptions(entrypoint_fnc=entrypoint))
The @function_tool method exposes a narrow capability to the LLM; validate authorization, inputs, and side effects inside the real backend rather than trusting generated arguments. A compatible gateway such as CallMissed can also provide OpenAI-compatible endpoints when you want to change model providers without rewriting existing client integrations.
What should you configure before running?
Install dependencies and store secrets in .env, not source control:
python -m venv .venv
source .venv/bin/activate
pip install livekit-agents livekit-plugins-openai livekit-plugins-silero python-dotenv
Set LIVEKIT_URL, LIVEKIT_API_KEY, LIVEKIT_API_SECRET, and the credential required by your selected STT, LLM, and TTS plugins. Then run the worker with the command documented for your installed SDK; test with a LiveKit browser client and inspect participant, transcript, and provider logs.
What commonly breaks first?
Why does the agent not join the room?
Why is there no audio?
Why does the tool not run?
Why does syntax differ from the documentation?
When should I use Agent Builder?
How do you test a LiveKit voice agent locally from a browser, and what should you inspect?
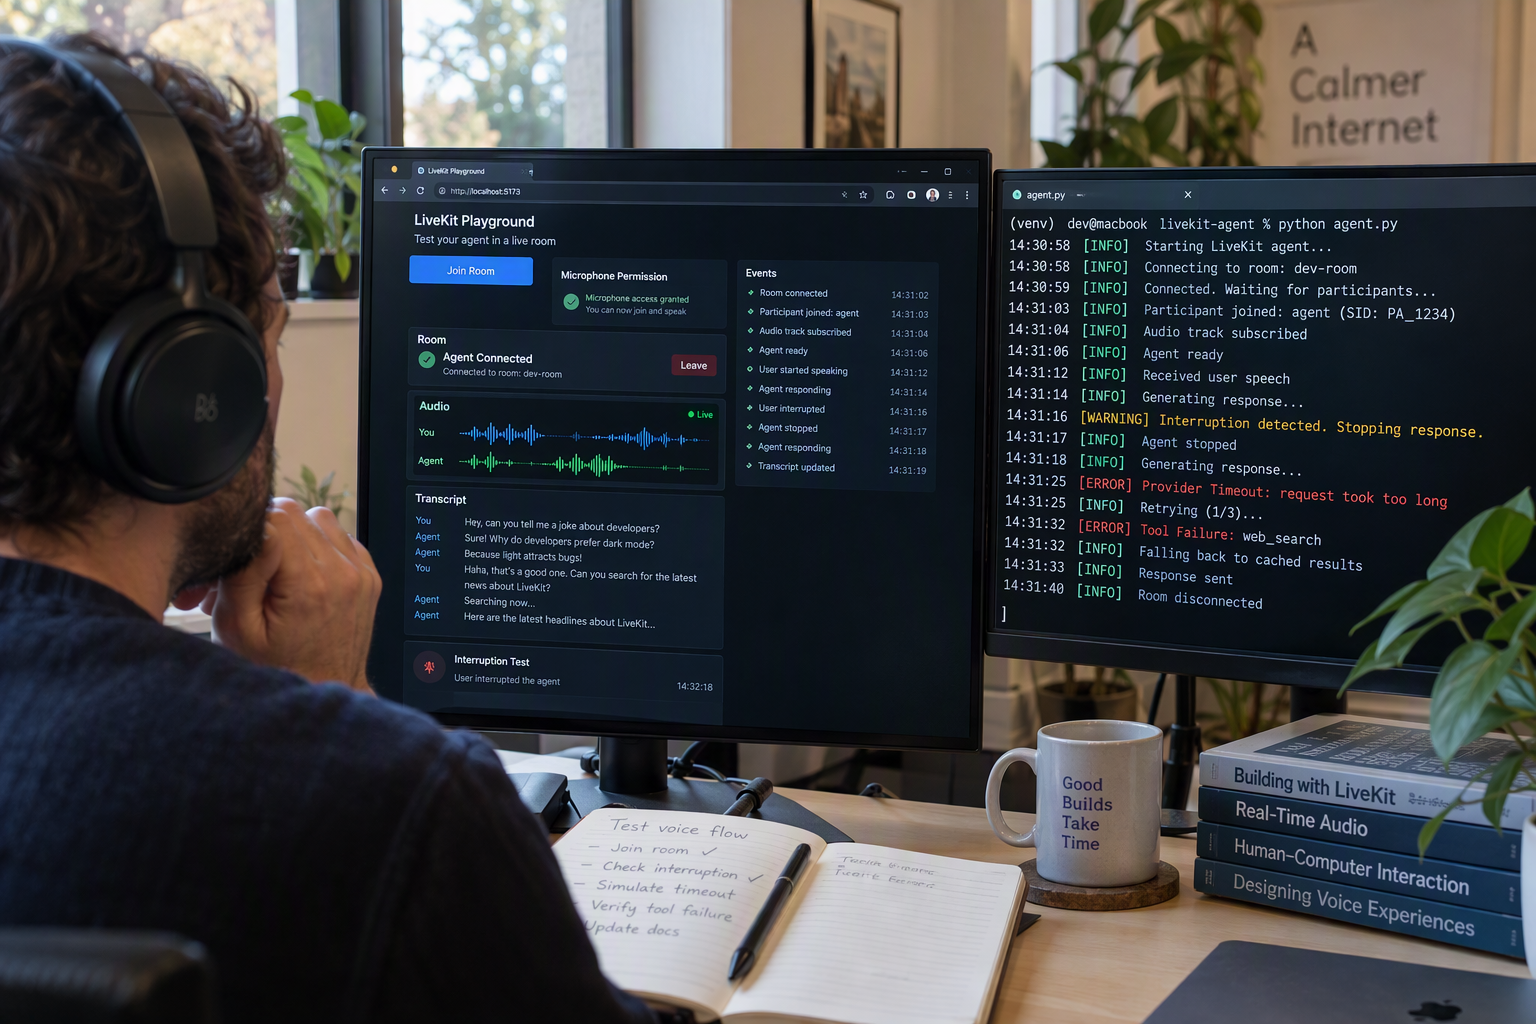
To test a LiveKit voice agent locally from a browser, start the Python worker in development mode, connect a browser client to the same LiveKit room, and grant microphone access. Then inspect room participation, published audio tracks, turn-taking, interruptions, provider responses, and server logs—not just whether the agent speaks once.
How do you start a local LiveKit agent for browser testing?
From the project’s virtual environment, run the agent entrypoint in development mode:
python agent.py devThe exact command and entrypoint name can vary by installed LiveKit Agents SDK version, so verify the current command in the LiveKit Agents documentation before publication. The worker should load LIVEKIT_URL, LIVEKIT_API_KEY, LIVEKIT_API_SECRET, and the configured STT, LLM, and TTS credentials from .env.
Next, open a browser client such as the LiveKit Agents Playground, or use your own frontend that creates a room token and connects to the same LiveKit project. The browser must:
- Request microphone permission.
- Connect to the LiveKit room over the configured WebSocket URL.
- Publish its microphone track.
- Subscribe to the agent’s audio track.
- Display connection and participant state.
The LiveKit documentation describes the Agents framework as a way to add Python or Node.js programs to LiveKit. In this test, the browser is one realtime participant and the Python worker is another; the STT, LLM, and TTS providers remain external components in the processing pipeline.
What should you inspect during the first browser call?
Start with a short, deterministic prompt such as: “What are your opening hours?” Avoid testing several integrations simultaneously. Confirm these events in order:
- Room connection: the browser and agent join the same room.
- Audio publication: the browser publishes a microphone track.
- Speech recognition: the agent receives audio and produces a transcript.
- Turn detection: the agent waits until the user finishes speaking.
- LLM response: the configured model returns text or streamed tokens.
- TTS publication: synthesized audio appears as a subscribed agent track.
- Interruption handling: speaking over the agent stops or cancels its response.
Use browser developer tools to inspect microphone permission errors, WebSocket failures, and autoplay restrictions. In the Python terminal, log session events, recognized transcripts, tool calls, provider errors, and response timing. Do not log API keys, access tokens, or sensitive conversation content in a shared development environment.
| Observation | Likely meaning | First check | Relevant status |
|---|---|---|---|
| Browser cannot join | Invalid URL, token, or project credentials | .env, token audience, WebSocket URL | 401/403 |
| Browser joins but no agent appears | Worker is offline or not dispatching | Python process and room name | 404/timeout |
| Agent hears nothing | Microphone track is absent or muted | Browser permissions and published tracks | 200 but no audio |
| Agent responds in text but stays silent | TTS failure or unsubscribed audio | TTS logs and browser subscription | 200/5xx |
Which browser behaviors reveal production problems?
Test barge-in by interrupting the agent mid-sentence, silence by waiting without speaking, and recovery by disabling and re-enabling the microphone. Also test a slow or failed provider response to verify that the UI shows a useful state instead of appearing frozen.
LiveKit’s Agent Builder can generate best-practice Python code and deploy agents to LiveKit Cloud, according to LiveKit documentation. For local debugging, however, a code-first worker provides clearer access to logs, provider configuration, tool execution, and session state.
Which LiveKit voice-agent approach is best for your use case? Compare code, Agent Builder, external AI providers, deployment, and verified data
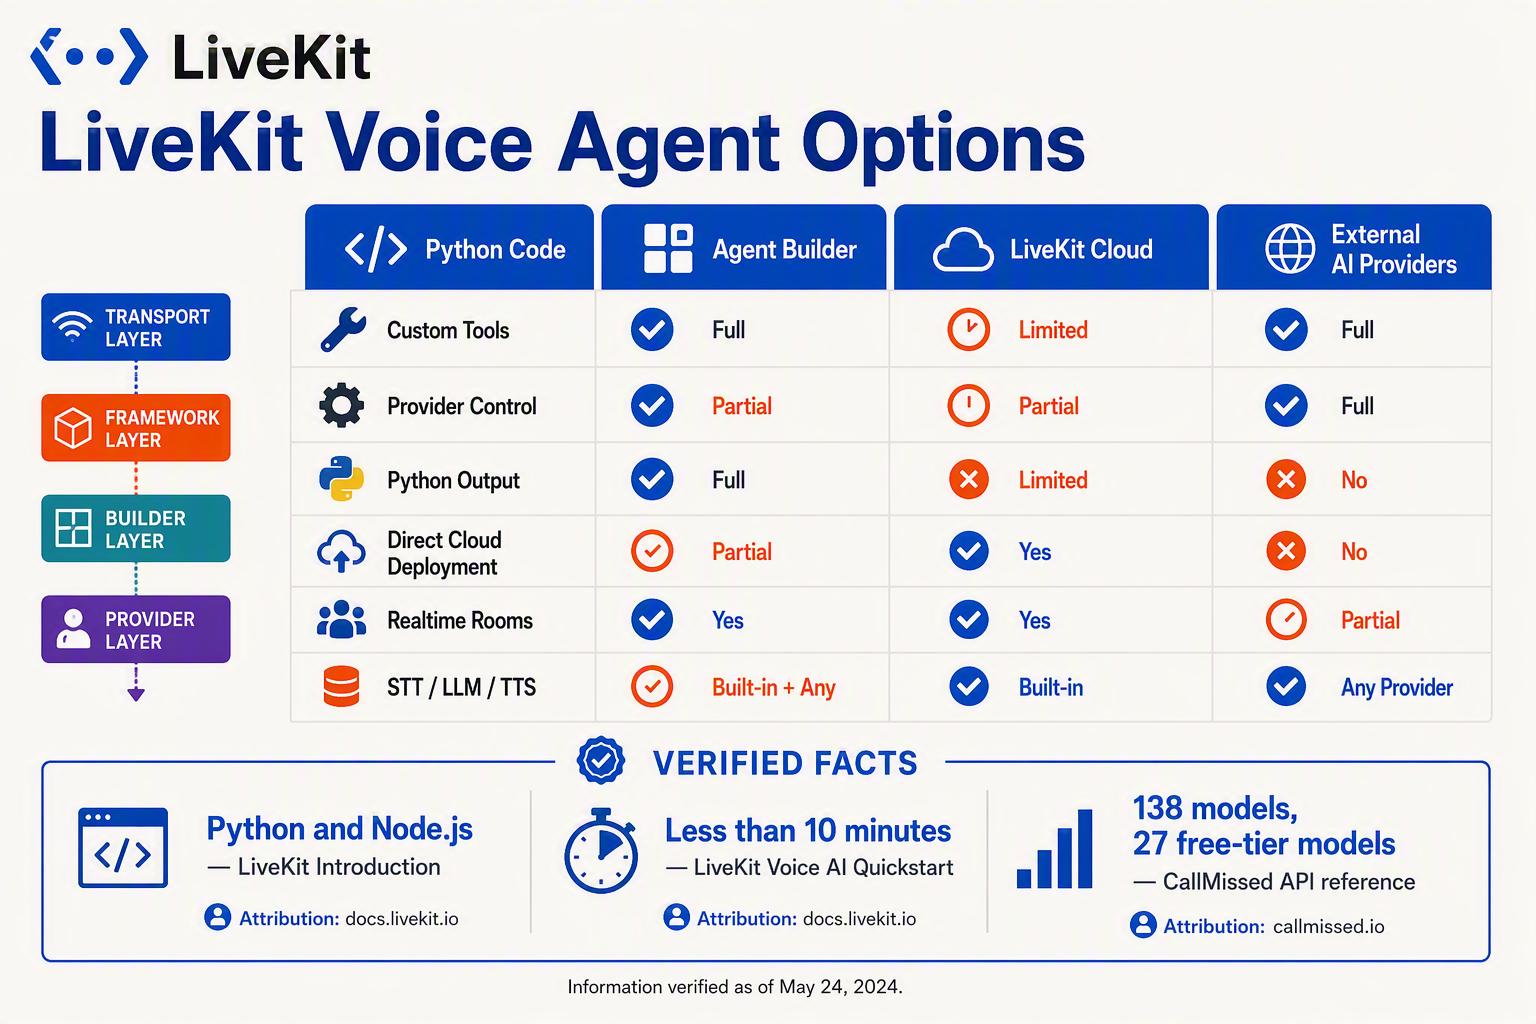
Install the LiveKit Agents Python SDK, create an entrypoint that joins a LiveKit room and starts an AgentSession with STT, LLM, and TTS providers, then configure LiveKit and provider credentials before running locally. Choose code-first Python for control, Agent Builder for a generated starting point, and LiveKit Cloud when you need managed deployment.
Which LiveKit voice-agent approach fits your project?
The right approach depends on how much runtime control you need and where the agent will run. LiveKit supplies realtime rooms, participants, audio tracks, and the agent lifecycle; external AI providers usually supply speech recognition, language-model reasoning, and speech synthesis.
| Approach | Best use case | What you control | Deployment path | Verified facts |
|---|---|---|---|---|
| Python SDK, code-first | Custom tools, business logic, prompts, memory, and interruption behavior | AgentSession, providers, tools, turn detection, state, error handling | Run locally, then package and deploy | LiveKit Agents supports Python and Node.js, according to LiveKit Documentation, accessed September 2026 |
| LiveKit Agent Builder | A fast prototype or teams that want generated best-practice code | Prompt and configuration first; refine generated Python later | Deploy directly to LiveKit Cloud | LiveKit says Agent Builder produces Python code using the Agents SDK and deploys agents to LiveKit Cloud |
| External STT, LLM, and TTS providers | Selecting models for language coverage, quality, cost, or latency | Provider credentials, model names, fallback logic, streaming, and output behavior | Provider accounts plus your LiveKit runtime | LiveKit’s voice pipeline combines provider adapters with the LiveKit agent runtime; verify model names against current provider documentation |
| Self-managed deployment | Regulated workloads, private infrastructure, or custom observability | Containers, workers, secrets, scaling, logs, and network controls | Your VM, Kubernetes cluster, or another host | LiveKit Agents can add Python programs to LiveKit; deployment details remain environment-specific |
| LiveKit Cloud deployment | A managed path from local test to production | Agent code and deployment configuration | LiveKit Cloud using the deployment quickstart | LiveKit Documentation provides a dedicated “Agent deployment quickstart” for deploying a Python voice agent |
What does LiveKit handle versus the AI providers?
A browser, mobile client, or telephony participant connects to a LiveKit room. The Python agent joins that room as another realtime participant, receives audio, sends speech to an STT service, passes the transcript and conversation context to an LLM, and publishes synthesized TTS audio back to the room.
Your implementation should also account for:
- Turn detection, so the agent knows when the user has finished speaking.
- Interruption handling, so user speech can stop an in-progress response.
- Tools, such as order lookup, calendar booking, or account retrieval.
- Session state, including conversation history and authentication context.
- Observability, including transcripts, errors, provider usage, and call outcomes.
LiveKit’s official voice-AI quickstart states that developers can create a basic voice agent in less than 10 minutes, according to LiveKit Documentation. That benchmark describes initial setup—not production hardening—so validate SDK syntax, plugin versions, provider models, and deployment commands against the documentation available in September 2026.
When should you use a provider gateway?
A provider gateway can simplify model switching when your application should not be tightly coupled to one vendor’s SDK. For example, CallMissed’s developer AI API provides OpenAI-compatible and Anthropic-compatible endpoints for 138 models, including LLM, realtime voice-agent, speech-to-text, and text-to-speech models, according to the CallMissed fact sheet current as of September 2026. Confirm that the selected provider exposes the streaming and audio interfaces required by your LiveKit adapter before integrating it.
How do you deploy and harden a LiveKit voice agent for production?
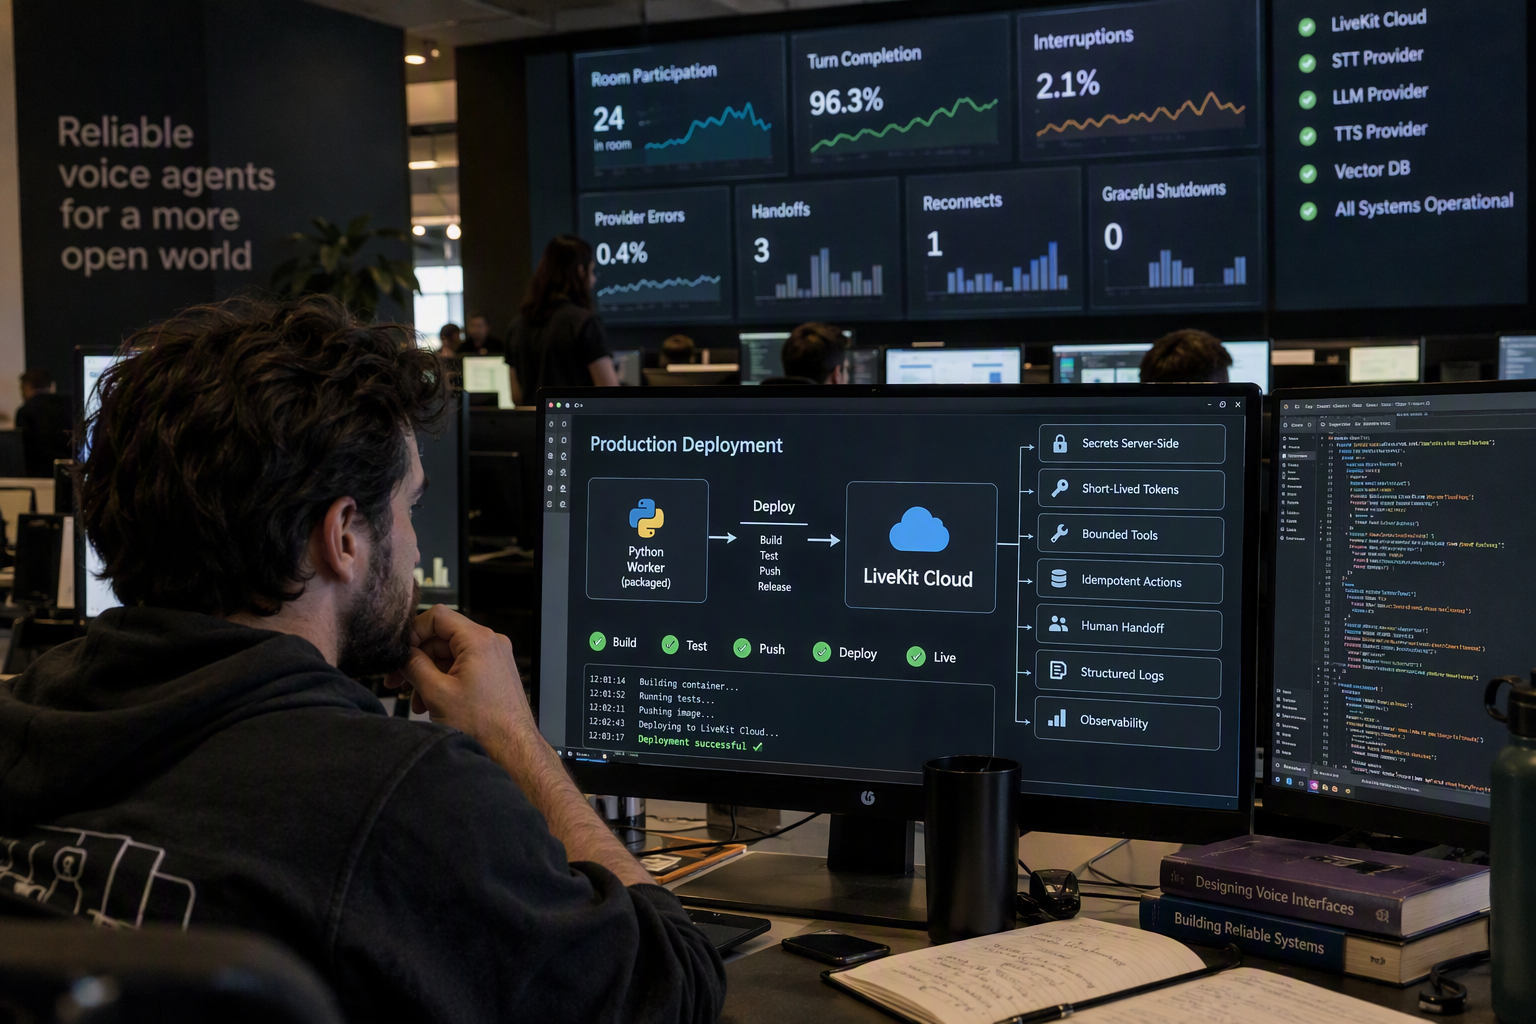
Deploy a LiveKit voice agent by packaging the Python worker, storing LiveKit and provider secrets outside the image, then running multiple health-monitored workers behind LiveKit Cloud or your own orchestration platform. Harden production behavior with pinned dependencies, least-privilege credentials, bounded tool calls, reconnect handling, structured logs, and tests for latency, interruptions, provider failures, and unexpected user input.
What does LiveKit provide in production?
LiveKit provides realtime transport and agent lifecycle management; external providers provide speech recognition, language generation, and speech synthesis. A browser, mobile application, or telephony participant publishes audio to a LiveKit room, while the Python Agents worker joins as another participant and runs the AgentSession pipeline.
The production boundary should be explicit:
| Layer | Responsibility | Production control |
|---|---|---|
| LiveKit room | Audio transport, participants, tracks, connection lifecycle | Token scope, region, reconnect policy |
| Agents worker | Session state, turn detection, interruptions, tools | Concurrency limits, graceful shutdown |
| STT provider | Converts speech to text | Language, timeout, fallback |
| LLM provider | Produces text and tool decisions | Token budget, model policy, guardrails |
| TTS provider | Converts text to audio | Voice, streaming, timeout |
LiveKit’s documentation says a basic voice AI agent can be created in less than 10 minutes, but production readiness requires operational controls beyond that quickstart. Confirm the installed SDK’s current syntax, plugin names, and model identifiers against the LiveKit documentation before deployment because these interfaces are version-sensitive.
How should you package and deploy the Python worker?
Use a pinned dependency file and a small container. Do not copy .env into the image or commit it to source control.
FROM python:3.12-slim
WORKDIR /app
COPY requirements.txt .
RUN pip install --no-cache-dir -r requirements.txt
COPY agent.py .
CMD ["python", "agent.py", "start"]
A deployment platform should inject LIVEKIT_URL, LIVEKIT_API_KEY, LIVEKIT_API_SECRET, and the selected STT, LLM, and TTS provider credentials through its secret manager. Set CPU and memory limits, configure automatic restarts, and run at least two workers when availability requirements justify redundancy. LiveKit’s Agent deployment quickstart documents deployment to LiveKit Cloud; LiveKit Agent Builder can also generate best-practice Python code and deploy directly to LiveKit Cloud, according to LiveKit documentation.
Before going live, verify:
- Graceful shutdown: stop accepting new jobs, finish or safely hand off active sessions, then exit.
- Observability: log room ID, participant ID, session ID, model, tool name, duration, error type, and correlation ID—but never raw secrets.
- Capacity: load-test simultaneous sessions and provider rate limits rather than assuming local performance scales.
- Data policy: define retention for recordings, transcripts, and prompts; redact payment, password, and identity data.
- Tool safety: validate arguments, apply short timeouts, use allowlists, and require confirmation for irreversible actions.
What should a production troubleshooting checklist cover?
Why does the worker fail immediately after deployment?
LIVEKIT_URL, LIVEKIT_API_KEY, and LIVEKIT_API_SECRET are present and that the URL uses the expected secure protocol. Then inspect the provider credential names and confirm the worker’s SDK and plugins match the versions tested locally.Why is the agent connected but silent?
Why does the assistant speak over the caller?
Why do tools make the call hang?
How should LiveKit production failures be investigated?
What common LiveKit voice-agent mistakes should you avoid? Troubleshoot credentials, audio, dispatch, SDK versions, interruptions, tools, and cloud deployment
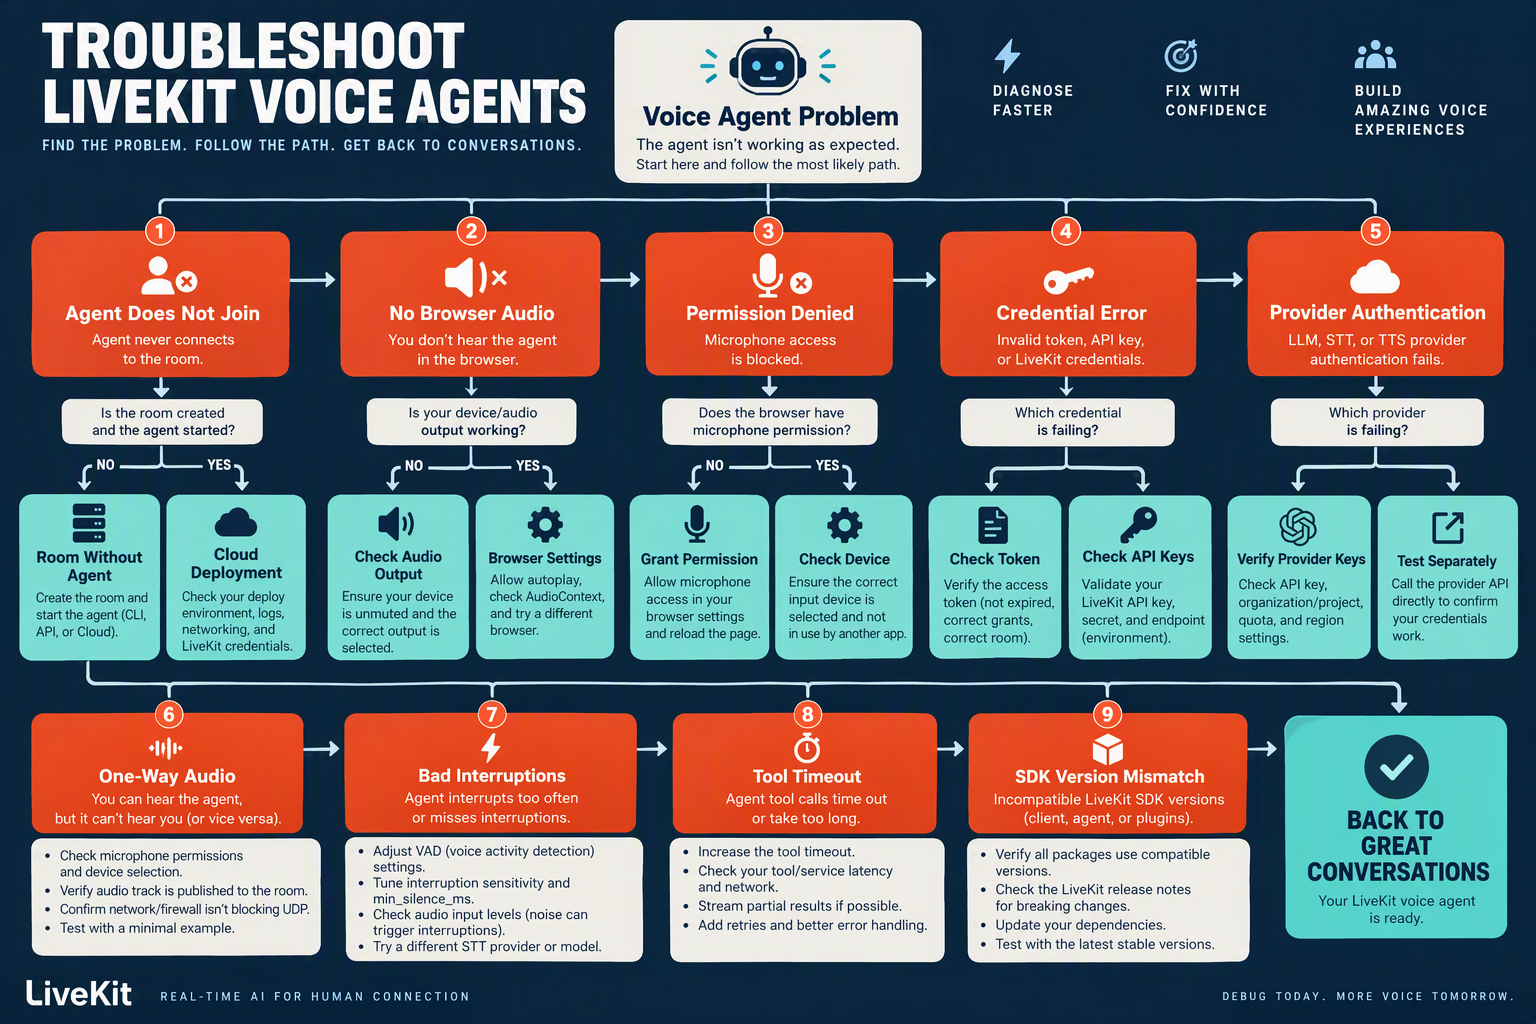
A reliable LiveKit voice agent depends on more than valid Python: verify credentials, room dispatch, published audio, SDK compatibility, interruption behavior, tool permissions, and cloud configuration independently. LiveKit’s official quickstart says a basic voice AI agent can be created in less than 10 minutes, but these checks prevent a prototype from failing when you move beyond local testing.
Which LiveKit voice-agent failures should you troubleshoot first?
Use this sequence: confirm the worker starts, verify that the agent joins the intended room, check that audio tracks are published and subscribed, then inspect provider responses and session events. The LiveKit Agents framework supplies realtime rooms, participants, and agent lifecycle management; your STT, LLM, and TTS providers supply transcription, reasoning, and speech synthesis.
| Symptom | Most likely cause | What to check | Practical fix |
|---|---|---|---|
| Worker exits or cannot connect | Missing or incorrect credentials | Confirm LIVEKIT_URL, LIVEKIT_API_KEY, and LIVEKIT_API_SECRET; check that the URL uses the correct secure transport scheme | Load the same .env file used by the process, remove whitespace or accidental quotes, and rotate exposed keys |
| Agent never appears in the room | Dispatch or room-name mismatch | Compare the room name, participant identity, agent name, and dispatch rule with the LiveKit project configuration | Start with one known room and one worker; add logging around worker startup and room-join events before adding routing logic |
| Agent joins but produces no sound | No subscribed input, missing TTS output, or unpublished track | Inspect room participants and audio tracks; confirm the STT receives input and the TTS provider returns audio | Test microphone permissions, audio-device selection, provider credentials, and whether the agent publishes its audio track |
| Import errors or rejected method arguments | LiveKit Agents SDK version differs from the example | Compare installed package versions with the current LiveKit Python documentation and provider plugin requirements | Pin tested versions in requirements.txt, recreate the virtual environment, and update code and plugins together |
| Agent talks over the user or misses turn changes | Turn detection or interruption settings are unsuitable | Test short answers, pauses, barge-ins, and background noise; inspect session and interruption events | Tune turn detection and prompt instructions, and verify that user speech can cancel or interrupt active TTS playback |
| Tools work locally but fail in production | Missing secrets, network access, or unsafe tool contracts | Log tool name, validated arguments, timeout, and returned error—never raw credentials | Use narrow typed inputs, timeouts, retries where safe, least-privilege credentials, and explicit failure messages; test cloud deployment with the same provider configuration |
How do you diagnose LiveKit dispatch and cloud deployment?
Dispatch determines which agent worker handles a room, so a healthy Python process can still appear broken if the room is not routed to it. Confirm the worker is running, the room is created as expected, and the dispatch configuration targets the correct agent entrypoint. A browser or mobile client should also publish an audio track that the agent can subscribe to; joining the same room alone does not guarantee audio flow.
Before deploying to LiveKit Cloud, run the complete path locally with production-like environment variables. LiveKit’s Agent deployment quickstart documents the cloud deployment workflow, while Agent Builder generates Python code using the LiveKit Agents SDK and deploys agents directly to LiveKit Cloud. Treat generated code and provider model names as version-sensitive: check the current LiveKit documentation before pinning dependencies or upgrading the SDK.
For production debugging, capture structured events for:
- Worker startup and SDK version
- Room join, participant identity, and dispatch result
- Audio-track publication and subscription
- STT, LLM, and TTS request failures
- Tool latency, timeout, and validation errors
- User interruptions and session termination
LiveKit’s tool definition and use documentation recommends tools for extending agent context and overcoming LLM limitations; keep those tools deterministic and observable. A voice agent should fail safely—responding that an action could not be completed rather than inventing a result.
What should you read and build next after your LiveKit voice-agent quickstart?
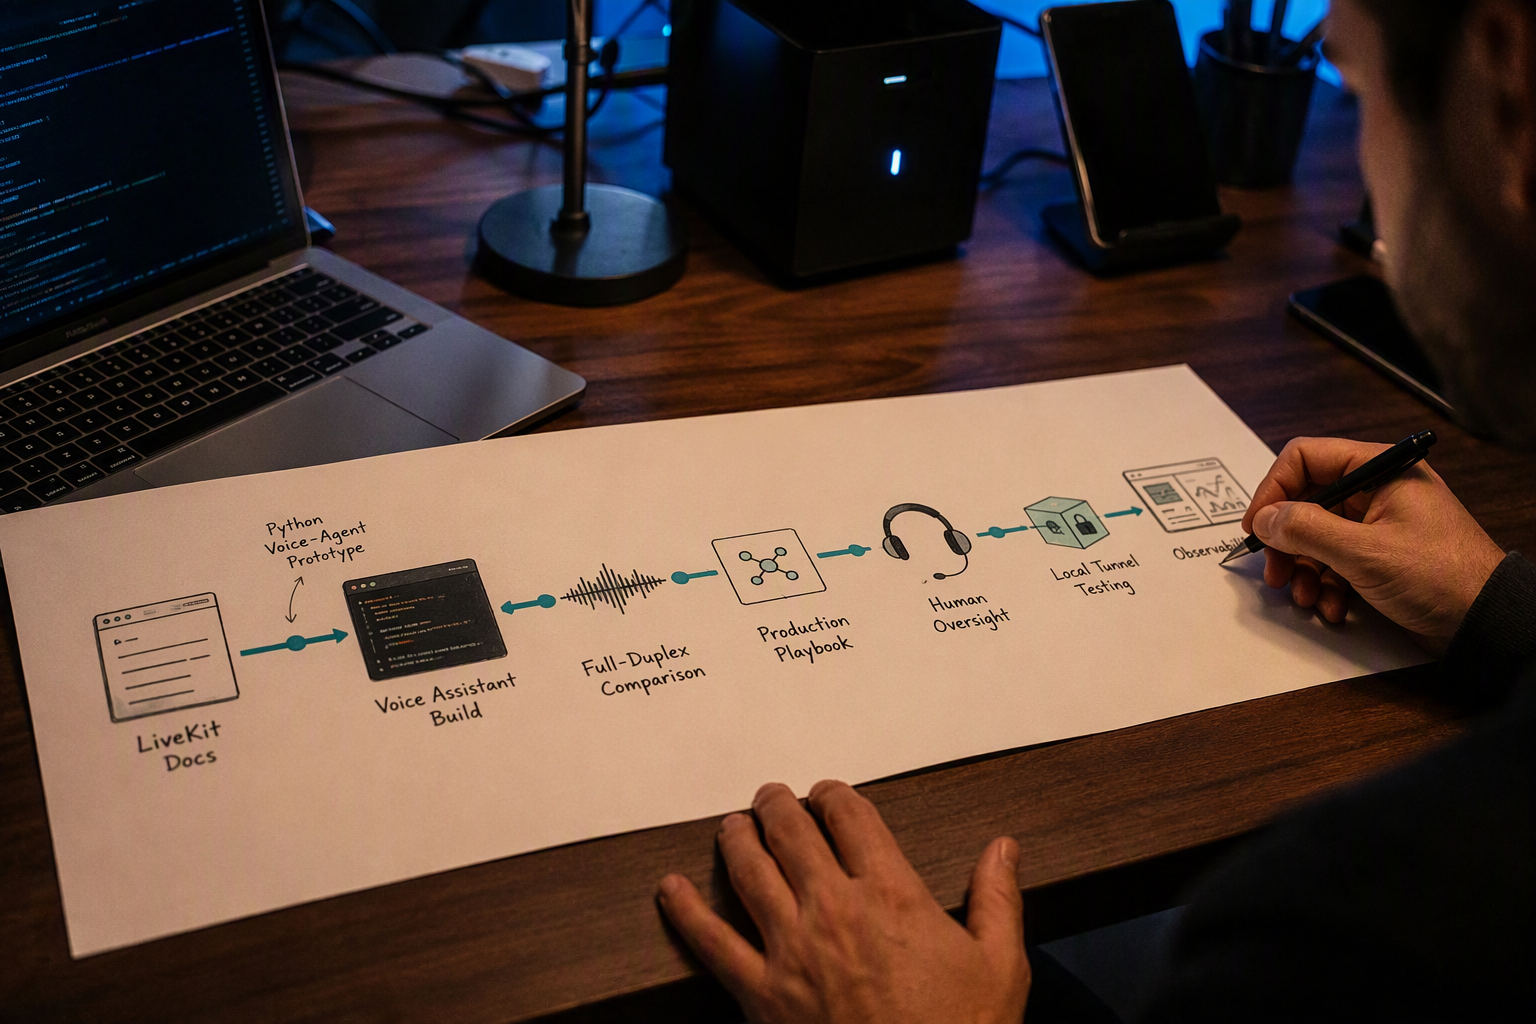
The next step after a LiveKit voice-agent quickstart is to turn the demo into a small, testable product: add tools, improve turn-taking and interruption behavior, instrument the session, then deploy the Python worker. Read LiveKit’s documentation for prompting, tools, and deployment alongside the provider documentation for the exact STT, LLM, and TTS models installed in your project.
What should you build after the basic LiveKit voice agent?
Build in this order so each change remains easy to test:
- Add one safe tool. Start with a read-only function such as checking order status, retrieving an appointment, or searching a knowledge base. Validate arguments in Python, authenticate every external request, and return concise results that the model can explain.
- Improve conversation behavior. Tune turn detection, interruption handling, silence timeouts, and the system prompt. LiveKit’s prompting guide specifically recommends instructing voice agents not only on what to say, but also on how they should sound.
- Add session state. Store only the context the agent needs for the current call, and persist business data in your application database rather than relying on an in-memory process.
- Add observability. Capture transcripts, tool calls, failures, response timing, and user handoffs. Create test conversations for interruptions, ambiguous requests, invalid tool inputs, and provider outages.
- Deploy the worker. Follow LiveKit’s Agent Deployment Quickstart for secrets, worker configuration, health checks, and LiveKit Cloud deployment.
| Minimum build element | Quantity in the quickstart pipeline | Responsibility |
|---|---|---|
| LiveKit realtime room | 1 | Audio transport and participant connectivity |
| Speech-to-text provider | 1 | Converts user audio into text |
| Language model | 1 | Generates the agent’s response |
| Text-to-speech provider | 1 | Converts the response into audio |
LiveKit’s official Voice AI Quickstart says developers can create a basic voice assistant in less than 10 minutes, but that benchmark describes the initial demonstration, not production readiness. Confirm provider names, model identifiers, and Python method signatures against the current LiveKit Agents documentation before publishing or upgrading dependencies.
Should you try LiveKit Agent Builder or stay with Python?
Use LiveKit Agent Builder when you want to validate a conversational flow quickly or when a non-developer needs to edit prompts and configuration. LiveKit documentation says Agent Builder generates best-practice Python code using the LiveKit Agents SDK and deploys agents directly to LiveKit Cloud.
Stay code-first when you need custom authentication, complex tools, database transactions, bespoke routing, or automated tests. A practical path is to prototype the flow in Agent Builder, inspect the generated Python, and then move business logic into a version-controlled application.
What should you read next?
Prioritize these LiveKit resources:
- Tool Definition and Use: learn how tools extend context and address tasks an LLM cannot complete alone.
- Prompting Guide: improve voice realism, brevity, confirmations, and interruption behavior.
- Agent Deployment Quickstart: move from a local worker to LiveKit Cloud.
- Recipes and Examples: compare complete Python implementations and supported patterns.
For multilingual products, also verify the selected providers directly. Platforms such as CallMissed demonstrate another approach: its API provides one key and balance across 138 models, while its voice platform supports speech recognition in 22 Indian languages plus English. That can be useful when evaluating whether to assemble provider components yourself or adopt a managed communication layer.
Frequently Asked Questions
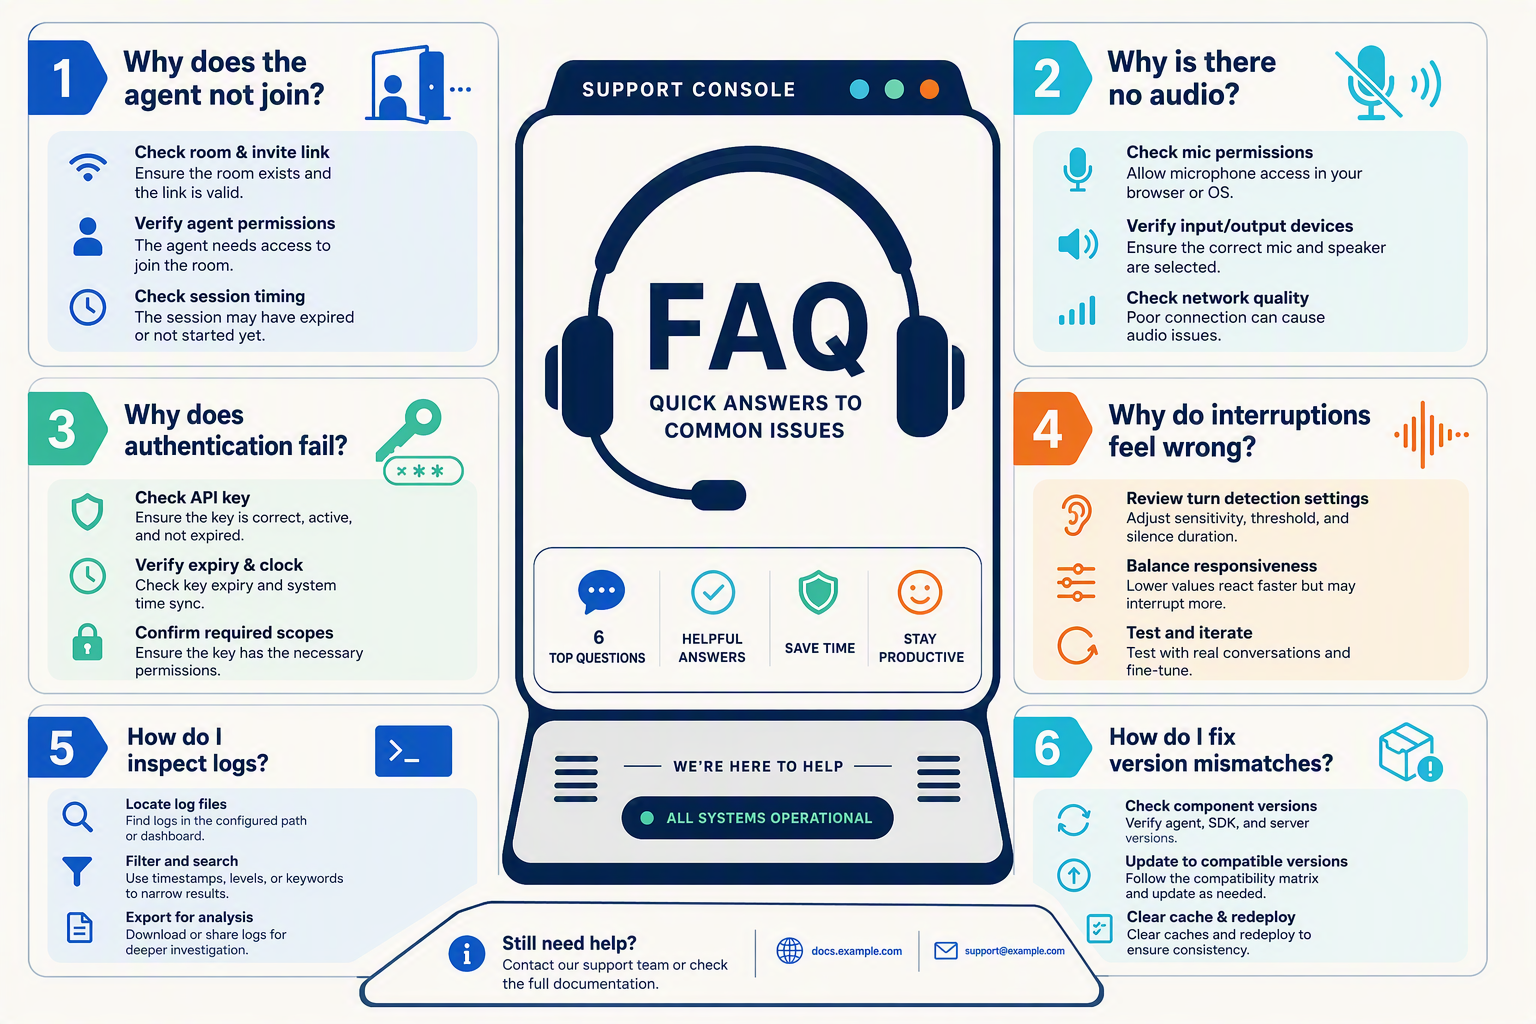
A failed LiveKit voice agent is usually caused by one of six issues: invalid room credentials, missing audio permissions, incorrect provider keys, turn-detection settings, insufficient logs, or incompatible package versions. Debug in that order, starting with the worker process and room connection before changing prompts or models.
Why does my LiveKit voice agent not join the room?
LIVEKIT_URL, LIVEKIT_API_KEY, and LIVEKIT_API_SECRET are loaded into the same shell or process that starts the Python worker. Confirm that the URL uses the correct LiveKit WebSocket endpoint, the API credentials belong to the same project, and the participant token grants the agent permission to join and publish audio. LiveKit’s Agents documentation separates the realtime room and participant lifecycle from the AI providers, so a provider failure should not be confused with a room-connection failure.Why is there no audio from my LiveKit voice agent?
How do provider API keys work when you build a voice agent with LiveKit?
.env files, and confirm that the provider plugin reads the variable name expected by the installed SDK version. Never expose provider keys in browser JavaScript or embed them in a client-issued room token.Why are interruptions and turn-taking wrong in my LiveKit voice agent?
How do I inspect LiveKit voice agent logs and find the failing stage?
How do I fix LiveKit Agents Python version mismatches?
python -m pip freeze, check the provider plugin versions, reinstall dependencies, and verify imports in the same interpreter used to launch the worker; errors involving renamed classes, model parameters, or session methods often indicate API drift. LiveKit’s quickstart and reference recipes are version-sensitive, so test the complete minimal agent after upgrades before adding tools, custom turn detection, or deployment configuration.Conclusion
Building a voice agent with LiveKit in Python starts with a focused path: install the LiveKit Agents SDK, connect an AgentSession to STT, LLM, and TTS providers, configure credentials, join a realtime room, and run the worker locally. From there, production reliability comes from explicit turn detection, interruption handling, session state, safe tools, observability, and deployment practices.
The guide’s main takeaways are:
- LiveKit supplies the realtime foundation: rooms, participants, audio tracks, connection handling, and the agent lifecycle.
- AI providers supply the pipeline intelligence: speech recognition converts audio to text, an LLM generates responses, and text-to-speech publishes audio back into the room.
- Python keeps the system adaptable: providers, tools, prompts, and deployment can evolve without replacing the room and session architecture.
- The shortest demo is not the whole product: LiveKit documentation says a basic voice AI agent can be created in less than 10 minutes, but credentials, silent audio, provider failures, and version-sensitive SDK syntax still require testing.
As realtime voice interfaces mature, watch for tighter turn-taking, more capable tool use, richer observability, and simpler paths from local Python workers to production infrastructure. Verify provider adapters and model names against current LiveKit documentation before shipping.
To explore how AI communication is evolving, check out CallMissed, an AI customer-communication platform with configurable voice agents and speech recognition in 22 Indian languages plus English. What voice workflow will you prototype next?
Related Reading
- Weather and News AI Agent: Build a Voice Assistant
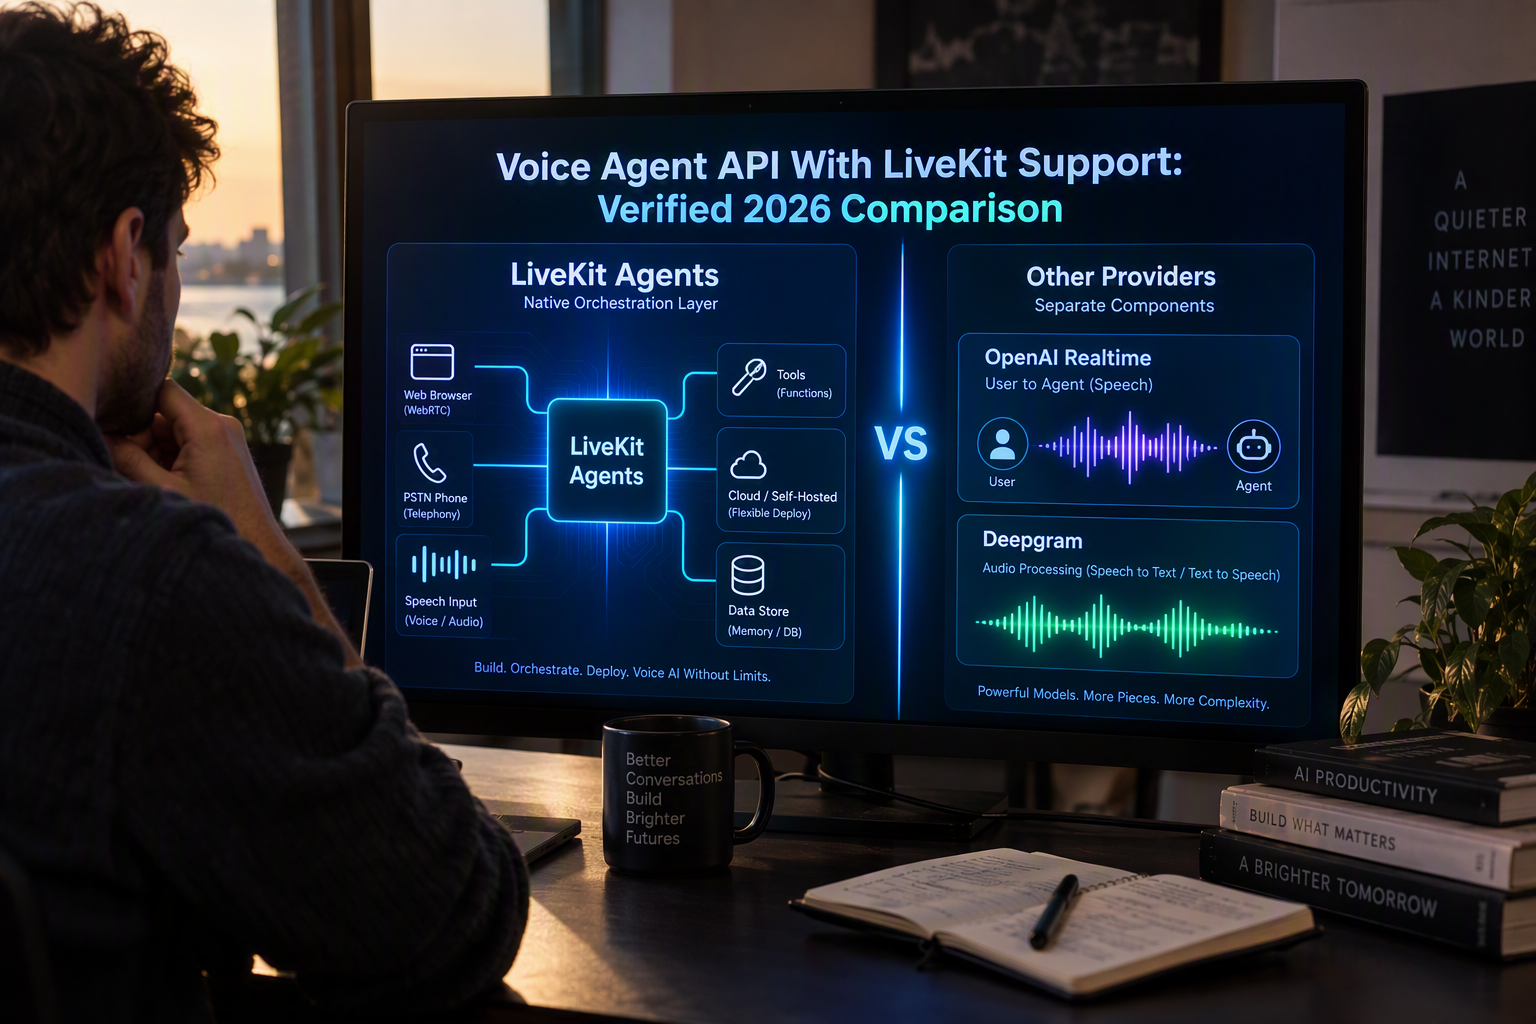
- Voice Agent API With LiveKit Support: Verified 2026 Comparison
- Voice Agent API with LiveKit Support: 2026 Comparison and Verdict
Sources
Discussion
Related Posts


Ready to automate customer conversations?
Launch AI voice agents and WhatsApp bots with CallMissed — one API, 22+ Indian languages.